Set up Sign In Person
Sign In Person functionality requires some preparation but once it’s set up guest signing takes less than a minute. You click Sign In Person, it locks access to any other place on your device and generates a document for signature. You pass your device over to the person who should sign the document. This person puts a signature. The signed document is stored in the email account that you choose.
To use Sign In Person, administrators should go through three simple steps:
Step 1: select an email to store documents in - set a guest signer account in a deployment of Sign In Person suitelet;
Step 2: make sure there is a signature field on a generated document - customize an Advanced PDF/HTML template, so that it would include a Signature fields;
Step 3: make sure that this exact template opens when you click Sign In Person - connect the template to a print form in the NetSuite object.
Sign In Person Step 1: Preset a guest signer account
Guest signer account stands for an account where you store all the documents signed by guest signers while using Sign In Person. Guest signers aren’t supposed to see any records in your NetSuite account, nor your Inbox, nor any other folder on your device. For that matter, you can preset a place to store the signed documents upfront, before passing over your device and locking all the other parts of it.
- Find Sign In Person suitelet in Script Deployments: go to Customization > Scripting > Scripts > signnow InPerson suitelet.
Tip: to find it easier, under Filters in TYPE dropdown select Suitelet, and in SCRIPT FILE dropdown, select Edit next to signnow_Server.js.

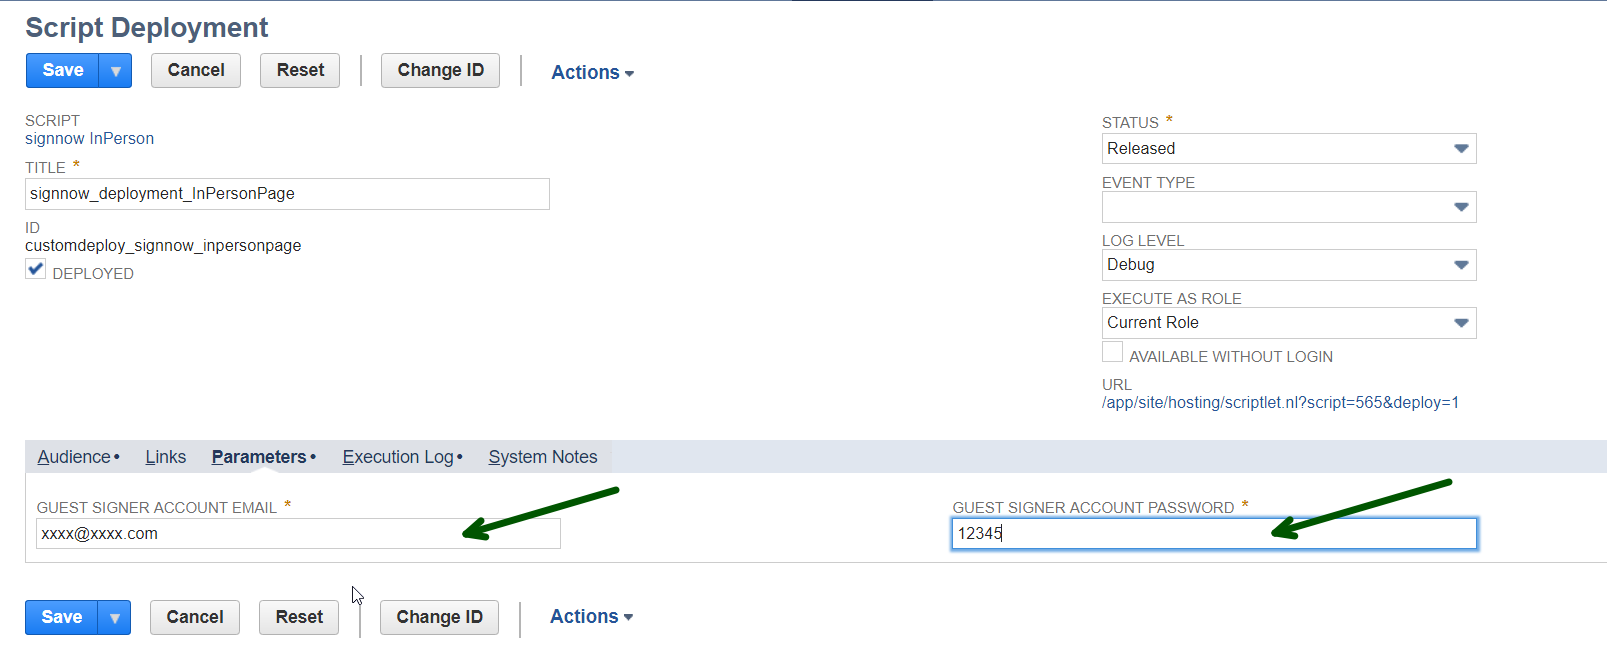
- Go to Deployments subtab in that suitelet. Select signnow_deployment_InPersonPage. Click Edit.
- Go to Parameters subtab. Edit GUEST SIGNER ACCOUNT EMAIL and GUEST SIGNER ACCOUNT PASSWORD.

That’s it. You can find all signed documents during Sign In Person under this email. The email and password you provided will be used automatically every time you start using Sign In Person.
Sign In Person Step 2: Add a Signature field to PDF/HTML template
With Advanced PDF/HTML templates NetSuite admins organize a layout for standard documents. For example, if you want to print a sales order from your NetSuite account it doesn’t have to look exactly the way it looks like in NetSuite. You can customize how it should look in a PDF using Advanced PDF/HTML template. This way you get professional branded documents automatically without manual retyping.
More on How to set up an Advanced PDF/HTML template in the next chapter. Good news is you don’t have to set it up from scratch, if you don’t want to - NetSuite created a bunch of standard Advanced PDF/HTML templates which will be there even if you just registered in NetSuite a second ago. You can find them here: Customization > Forms > Advanced PDF/HTML templates.
In this step we will use one of the standard templates and customize it. As it’s written in HTML code and visualized in PDF, we will add a Signature field to it using text tags.
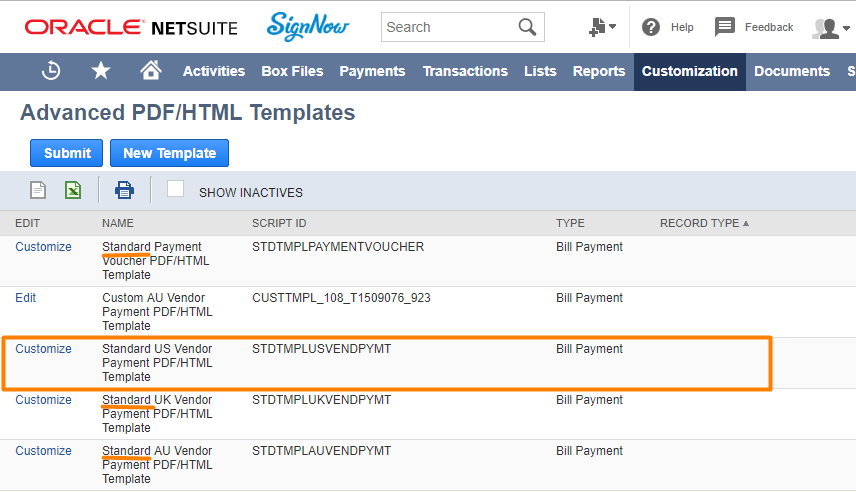
- Go to Customization > Forms > Advanced PDF/HTML templates.
- Select a standard template and click Customize.
All standard templates will have the word “Standard” in a title.

- In Source code add a text tag: {{t:s;r:y;o:”Signer 1”;;}}.

Click anywhere on a template to add this text tag. If you’re in HTML mode, you may want to type
to put the signature field in a new paragraph. As you can see, quotation marks in HTML turn to ".

Symbols in the text tag stand for: {{type:signature;required:yes;role:”Signer 1”;;}}.
You add any other field using this logic, or as many separate fields as many signers should sign the document. For the text field, you would type {{t:t; … }} (t for text). If the field isn’t required, you would do {{t:t;r:n; … }} (n for not).
Sign In Person Step 3: Connect the PDF/HTML template to the NetSuite record
Make sure this template would be the one that generates a document when you click Sign In Person.
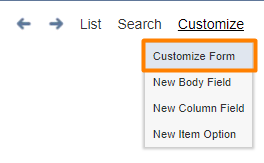
- In your record go to Customize menu in the right corner and select Customize Form.
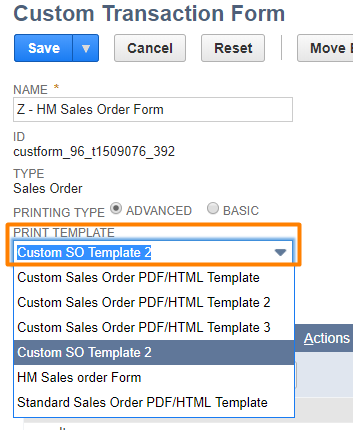
- Go to PRINT TEMPLATE and select your template from the dropdown.

Start customization

Select your Advanced PDF/HTML Template
For example, here you can see how a custom sales order template is selected for a Sales order record. Click Save when you’re done.
Updated less than a minute ago
